So you’ve just completed a really nice piece of beadwork, either on or off a bead loom, and you’re now faced with the problem of how to turn it into a finished bracelet you can proudly wear.
You’ll find there are a ton of helpful tutorials on how to set up and use a bead loom but when it comes to finishing your beadwork and adding a clasp, there’s really not much out there to help you.
This easy to follow guide is here to take you through the finishing process, and show you how to add a fastening, whether your beadwork is created on or off-loom.
Table of Contents
- Adding a Crimp Clasp or Ribbon End to a Bead Loom Bracelet (The glue and cut method).
- Adding a Slide, Toggle, Button or Bead Clasps to an On or Off Loom Bracelet

Notes:
The bead fastening will measure approximately 1 1/4″ in length. The toggle clasp will measure approx 1 1/2″. For a ribbon clasp, you should measure your clasp and adjust your bracelet length accordingly.
Bead Loom Bracelets
If you have the Ricks bead loom, we featured in our bead loom guide, you find you’ll only have two warp threads to deal with at the end of your project.
With most looms, however, you will have several warp threads at each end of your beadwork – as well as the weft thread (that’s the one your seed beads were threaded on to).
In this section, we’ll look at how to add a ribbon crimp to finish your beadwork.
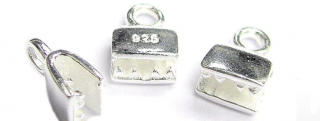
Adding a Crimp Clasp or Ribbon End to a Bead Loom Bracelet
OK, I have to be honest, this method is not one of my favorites. To be frank, it’s a bit messy and fiddly – mostly because it involves glue.
But also, because it’s really easy to accidentally dent the clasp when you close it – and you don’t really get a second shot if you don’t place it exactly straight and where it needs to be.
If you go for this method I strongly recommend you choose a good quality crimp or at least one you like enough to really want to wear as part of your bracelet or necklace.
The cheap findings don’t do it for me. They tend to let your work down a bit and a beautiful piece of beadwork can so easily be spoiled by the wrong clasp.
That said, if you find a pretty clasp and you’re feeling confident you can do a good job, the process (in theory) is pretty straight forward.
For this method, start with your beadwork still on the loom.
Your thread will be exiting the last bead from the left.
Here’s what to do:
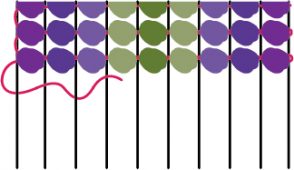
- Starting on the next row following your final row of beads, weave your thread in and out of your warp threads as if you were weaving a tapestry.
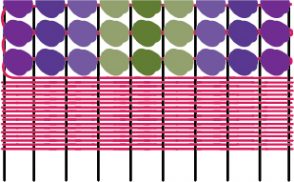
- Continue until you have approximately 1 cm of woven tapestry. Backstitch several times for extra security and then tie-off and cut your thread.
- Now add a thin layer of beading adhesive over the woven area, leaving it overnight to set.
- You can then trim the warp threads close to the woven/glued area and you are ready to add your crimp clasp to cover the entire area.
If you have Julia’s Beadalon Jewel Loom be careful when you cut the beadwork from the loom because the loom is under tension.
A nice touch is to add a small strip of ribbon or recycled sari over your woven area before gently and evenly closing the crimp over the end.
Toggle Clasps, Bead Clasps, and Magnetic Clasps for On or Off Loom Bracelets
For each of the following methods, you will need to sew in your threads first.
This will give you a neat stip of woven beadwork ready to add virtually any clasp of your choice.
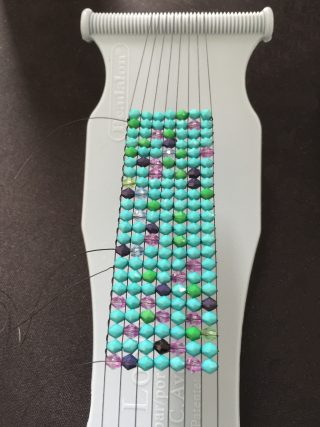
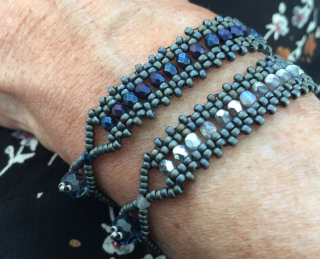
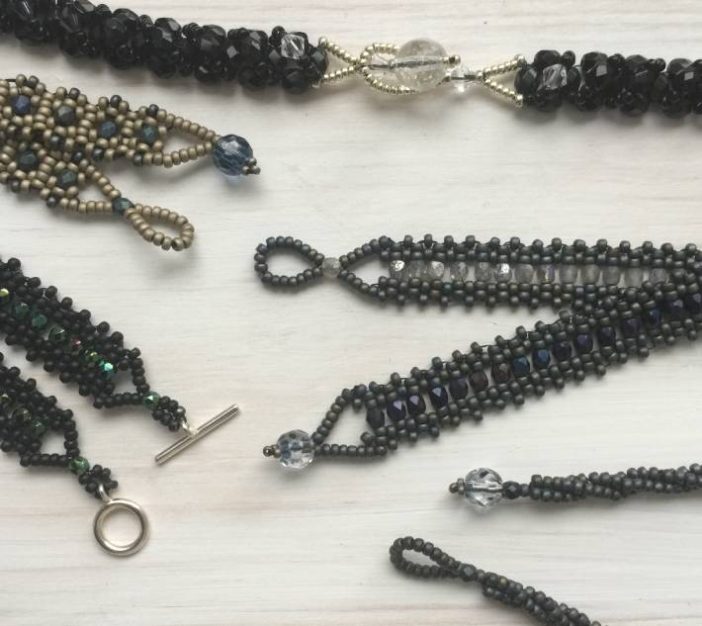
In this section, we’ll take you through how to sew in all your threads, and then we’ll look at some options for adding different types of clasps – including my personal favorite, the beaded clasp you can see in the photo above.
How to Sew In Your Threads
Cut or remove your beadwork from your loom leaving enough on your warp threads to sew in.
And remember if you have Julia’s Beadalon Jewel Loom, take care when you cutting the beadwork from the loom – the loom is under tension and it can release with quite a snap.
Sewing in Your Weft Thread
Your thread will be exiting from the left side.

Here’s what to do:
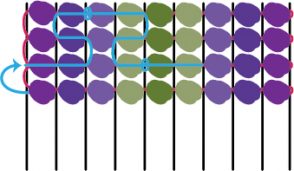
- Sew back up through a couple of beads in the row above.
- Now, sew up to the previous row changing direction and tie a half hitch knot before continuing along the row and up to the row before that.
- Continue doing this for a few rows before tying off your thread. Go through a few more beads before cutting or burning off your thread with a thread burner close to the last bead you exit.
There is no specific path you need to take. Just remember to follow the natural path of your beadwork so your thread virtually disappears.
Sew In Your Warp Threads
Here’s what to do:
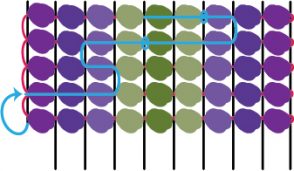
- Thread your beading needle onto the first warp thread.
- Sew into the next bead up, on the previous row, and continue to sew through your beadwork following the natural path of your beads. Tie a couple of half hitch knots here and there. Continue through the next few beads and then cut the thread close to the last bead you exited from.
- Repeat the process until all your warp thread are sewn in.
Tried to avoid going over the same path more than a couple of times or the thread will build up and you will no longer be able to get your needle through.
You may need to use a finer needle (from a size 10 to a size 12).
You are now ready to add a clasp.
How to Add a Toggle Clasp, Bead Clasp, or Magnetic Clasp
Adding a bead, toggle, or magnetic clasp is easy, and once you get the idea, the process is very similar for whichever fastening you choose.
For off-loom beadwork, you can use any beading thread you have still left on your needle (providing you have about 12″ left). Just make sure you thread exits where you want to add your fastening.
Alternatively, you can start a new thread. For bead loom bracelets, you will need to add a new thread.
Here’s what to do:
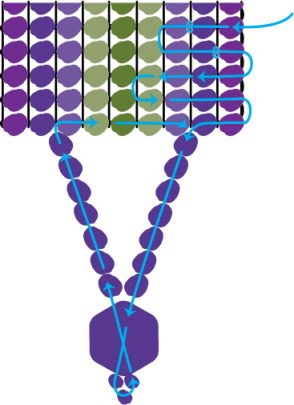
- Add a new thread to your beadwork several rows up and work your way down to the bottom row.
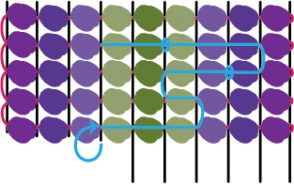
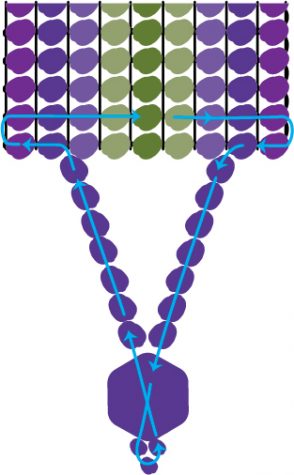
- Exiting the bead where you want your fastening to begin, Pick up 7x 11/0 Miyuki seed beads and 1x Swarovski crystal round bead. Size 8 is probably better though I used a size 6 for mine.
- Pick up 3x 15/0 Miyuki seed beads to make a picot.
- Sew back through the Swarovski crystal round bead and then pick up 7 more 11/0 Miyuki seed beads.
- Reinforce the fastening by going round the path again.
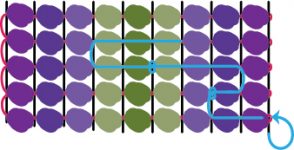
- Now reinforce the connection between the bracelet and fastening as shown in the center illustration above.
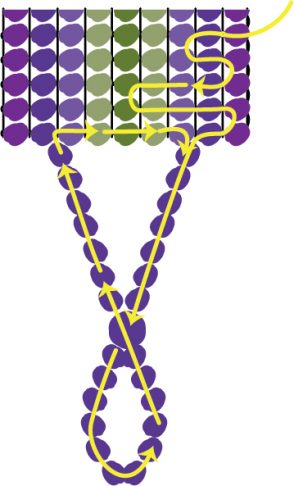
To make the loop enclosure for the opposite end, the process is very similar.
However, you will need to test how many beads you need in order to (only just) allow the Swarovski crystal bead to pass through the loop.
Add 5x 11/0 seed beads. Then add either a 3mm fire polish or a 3 or 4 mm Swarovski bicone crystal before creating a loop of around 16 or 17 11/0 beads (depending on your brand of beads and tension).
The silver toggle clasp was added in a similar way or you could choose a magnet fastening for this method too.
I’ve also added a bead and loop closure to my beaded lacy necklace tutorial which you may find helpful.
So there you have it. It’s easier than you think. And if you made it this far, one thing I really do recommend for beadwork is to get yourself a good craft light so you can properly see what you are doing – especially one with a magnifying glass. That way you’ll cut down on mistakes or be able to spot any more easily and backtrack before you’ve gone too far.
Check out our reading room for beading inspiration.
Love these tips! Thank you so much!