
Applying a Pattern to a Shape
Illustrator Tutorial
If it all gets a bit much there’s a free jpg. of this illustration at the end to download for your own use.
OK, so here is the waffly bit, you can skip to step one, I won’t be offended….
I have been trying to think back to when I first started to use illustrator. I could draw reasonably well and could handle the basics but anything more than that was way beyond me. I remember drawing a mom pushing a baby in a stroller and wanting to add more detail to the illustration.
I could manage a dotted line for the sewing on the seam of her jeans quite easily but having decided I wanted to have her wearing a cardigan with a knitted effect on it, I spent literally hours of trial and error trying to get the effect to work properly.
The initial steps were straight forward but when I tried to change the color of the stitches it turned into a block of color with no stitches (I now know that is because the process creates a lot of unfilled paths which would,of course, fill with color as soon as a new color is selected).
You can see the results of my very first attempt here.
Do you notice the pattern on the bag and stroller? That was my lap of honour once I’d worked out how the method worked on the cardigan. It looks a little basic looking back but it was five years ago and I still think it fits in well with the overall look of the illustration.
Although there are other ways to do this, for example, you could create a pattern and add it to the swatch pallet then color your shape with the pattern you just created but creating a pattern swatch that blends seamlessly is pretty tricky in itself.
So for this exercise, we will be using a simple method that will not only make any editing of the final product much easier and more straight forward, I think you will also find it both useful and pretty fool-proof. No knitting needles or yarn required.
So here we go…
Step One

Draw one sock shape.
Give it a basic background color and move it away from your central drawing space.
Step Two
Create a stitch…
Start by selecting the ellipse tool. Click on your page and a box will pop up with ‘width,’ and ‘height’ options you can experiment a couple of times to get the shape of stitch you like. I used a width of 0.2866 mm, and a height of 0.6088 mm.
So you now have a vertical oval. Give it a color fill, making sure it is different from your sock or you wont be able to see it later on. Now with your shape selected, double-click the ‘rotate tool’ and rotate about 30 degrees.

Next with shape still selected double click the reflect tool and create a copy selecting vertical at 90 degrees.

You should now have a cross of the two shapes. Select the top shape and holding down the ‘shift’ key, position the top shape to the right leaving just a small gap. You should now have a complete stitch shape. Group them together.

Step Three
Start Knitting…

Holding the ‘shift’ and ‘option’ keys down position the next stitch in the row and then repeat ‘command d’ (mac users) until you have a full row. The length you work to will determine to a large extent the size of stitch you will end up with for you finished sock.
A longer row is the way to go as it will give you the choice to make a smaller stitch if you need to. You don’t have to use the whole panel of stitches but “what’ll hold a lot…” as they say. (I went about 50 across.)
Select the entire row and group. Now holding down the shift and option keys, position the next row down and repeat.
I took it down for about 100 rows which was way more than I needed but it’s a good idea to save a copy of the finished block for future use and a block of 50 x 100 is a decent size to have on hand.

Group the entire block.
Step Four
Apply knitted texture to sock…
So first make sure everything is all on one layer or it won’t work. Make a copy of the block and move to the side (just incase you want to use it again later).

Place the sock down first then on top of that, the block of stitches. Now you’ve got to grab the sock below the stitches, copy and paste in front then bring to front so the copy sock is on top of the knitting.


Select the block of stitches and the top sock copy only and in the pathfinder menu, (under the Window menu) select crop.
Important Bit
Now, (and this is important to make it fully editable) either (if you have the Extended Select plugin) select unfilled paths and delete. Or, (and this is what I did) just go to object > flatten transparencies…
Now when you change the color of your stitches you won’t end up with a block of color with no stitch pattern.
Choose a color for your stitches and make sure it is global so that you can adjust the coloring easily should you change your mind.
See my Tip on Global Colors.
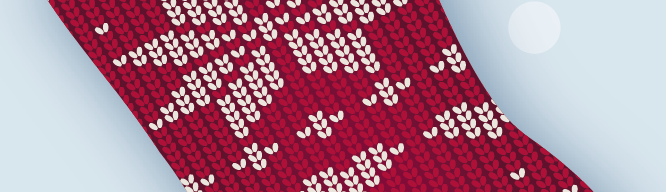
Once you are happy with the basic contrast between the stitches and sock shape, you can now work in contrasting colors to create a design or pattern into your sock shape.
You can use this technique to fill any shape with a pattern/design of your own.
(I added a blend on top of the base shape to add a bit of depth and a subtle highlight to the overall final look.)
I don’t know about you, but I feel like I’ve actually knitted these socks. It makes me want to take try out another craft.


Leave a Reply