
If you are someone who requires a lot of space for your artistic or crafting projects, you know the value of having a dedicated craft table. Regular desks may not have sufficient or appropriate storage, and using the family dining table can be inconvenient to say the least. To help you find the ideal craft table, we have conducted thorough research to provide you with the best options available.
As a seasoned crafter, I’ve tried and tested many tables in my day, and I’m here to guide you through the chaos and help you find the perfect table for your crafty endeavors.
Who came out on top? Drum roll, please…
Experience ultimate crafting efficiency with the Sauder Craft Pro, featuring a spacious 60×30 inch tabletop, ample storage space, and heat, stain, and scratch-resistant melamine top. And it will look great from any angle – our top pick for the best craft table, hands down.
Our Top Pick
|
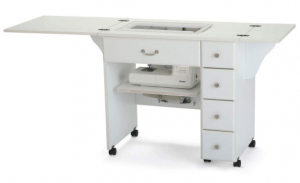
The Sauder Craft Pro Series |
 |
South Shore Crea Counter-Height Craft Table |
Runner Up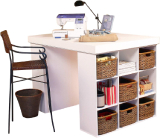
|
Project Center Desk |
Best Budget Option
|
Ameriwood Home London Hobby Desk |
Another Worthy Mention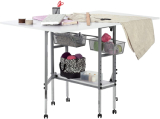 |
Sew Ready Studio Designs Folding Multipurpose Hobby and Craft Cutting Table |
Also Consider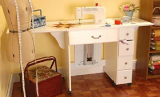
|
Arrow 901 Auntie |
Also in this guide.
Top Pick
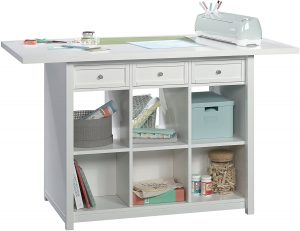
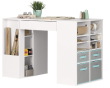
The Sauder Craft Pro Series
Experience ultimate crafting efficiency with the Sauder Craft Pro.
Affordable, and suitable for just about any craft, this table will adapt to fit your craft room as it will look good from any angle, whether you place it in the middle of the room or against a wall.
This craft table is hands down the best choice for any crafter looking to organize their space and get work done.
First off, the design is top-notch. It’s specifically crafted with crafters in mind, with ample drawer space and open storage areas for all your baskets, books, and other crafting essentials. And let’s talk about that tabletop – at 60 by 30 inches, it’s a much larger working surface than any standard office desk. There’s plenty of room for a large cutting mat, plus all your other craft equipment like a Cricut, sewing machine, task light, and more.
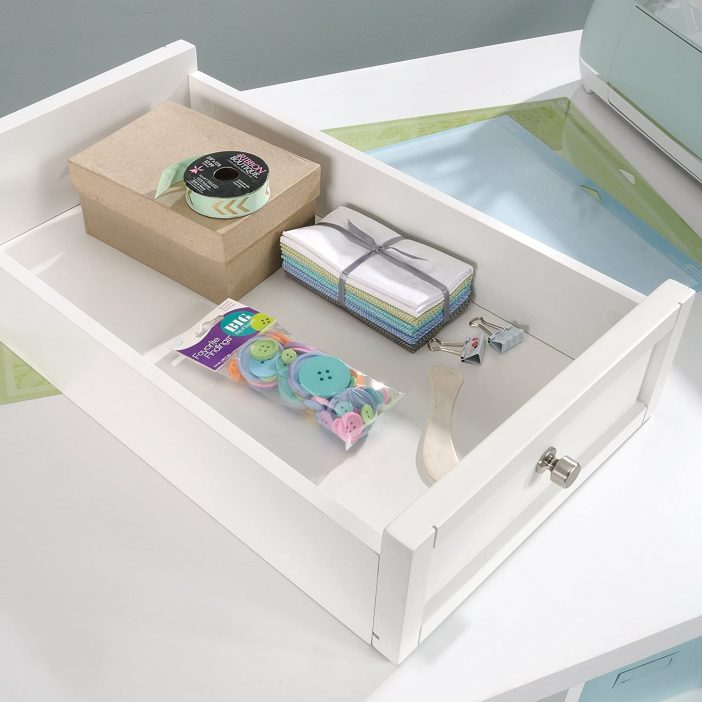
But the real standout feature of this table is the 3 large central drawers. Not only do they keep your craft tools close at hand, but you can actually remove them and place them on your worktop for easy access to everything you need. And let’s not forget about the heat, stain, and scratch-resistant melamine top – this table is sturdy and won’t vibrate when you’re sewing or working with other equipment.
Now, I know what you’re thinking – what are the cons? To be honest, the only downside we could find is that you won’t be able to get your knees under this table easily. So if you prefer to work sitting down, you might want to consider our next option. But other than that, this table is a solid choice for any crafter looking to maximize their time and efficiency. It’s affordable, looks good from any angle, and has plenty of storage and workspace.
The melamine top is heat, stain, and scratch-resistant this table is sturdy and won’t vibrate when sewing, for example.
Pros:
- Large tabletop surface area for ample crafting space
- Ample storage with drawers and open storage spaces for baskets and books
- Affordable price
- Laminated wood on all sides for a stylish appearance from any angle
- Heat, stain, and scratch-resistant melamine top for durability and stability
Cons:
- The only downside that we should point out is that you’re not going to get your knees under this one. So if you work solely sitting down you should go for our next option.
Check the latest price for The Sauder Craft Pro Series on Amazon.
Alternative Top Pick

South Shore Crea Counter-Height Craft Table
This craft table is a masterpiece for scrapbookers and other paper or fabric crafters.
It features a large storage area for rolls of paper or fabric, multiple shelves, and two handy spindles for spools of ribbons, etc., built into one end.
It comes complete with four pull-out storage bins, two large and two medium, making it ideal for keeping clutter like fabric off-cuts, yarns, or wool roving for needle felting out of sight. It also comes with eight adjustable shelves that can be slanted to hold paper, card, vinyl sheets, heat transfer paper, and more, and like our top choice, it also has a generous middle drawer to keep accessories such as scissors and fabric knives close at hand but safely away.
At 34 inches high, this table is a little taller than average, which makes it a comfortable height for standing without having to hunch over. It is an ideal height for cutting with a self-healing mat or for quilting, stamping, stained glass crafting, and more. Alternatively, it can easily be used with a stool.
The table is 53 inches wide and nearly 27 inches deep, and has a large scratchproof and water-resistant surface area, providing plenty of room for a die-cutting machine, embroidery or sewing machine, serger, or even a cabbing machine for jewelry making, etc. And you can rest assured it’s made from non-toxic laminated particleboard and comes with a 5-year warranty.
Pros:
- Large storage area for rolls of paper or fabric
- Multiple shelves and built-in spindles for ribbon spools
- 4 pull-out storage bins for clutter
- 8 adjustable shelves for organizing supplies
- Comfortable standing height for cutting or quilting
- Large scratchproof and water-resistant surface area
- Non-toxic laminated particleboard material
- 5-year warranty
Cons:
- May be too tall for some users to work comfortably while seated
- May be too wide or deep for some craft rooms
Runner Up
Project Center Desk
Upgrade your crafting game with this professional-looking craft desk with multiple adjustable cubby shelves.
It’s tall enough to work comfortably while standing up, without straining your back.
The Project Center Desk is a top-of-the-line craft table designed for professional crafters and serious hobbyists. With a spacious 15 sq ft surface area and adjustable shelves, it provides plenty of space to work on larger projects, as well as ample storage for all of your craft supplies.
One of the standout features of the Project Center Desk is its height – it is tall enough to work comfortably while standing up, without straining your back or neck. This is a great option for crafters who prefer to work standing up or those who simply want to switch up their working position throughout the day.
In addition to its ergonomic design, the Project Center Desk is also stylish, with a professional look that will fit in well with any craft room. It is available in three colors – oak, black, and white – so you can choose the one that best fits your personal style.
While it is a little pricier than the Sauder Craft Pro, the Project Center Desk is a solid investment for any serious crafter. It is built to last, with a durable construction that will withstand years of use. Plus, with its large working area and adjustable shelves, it provides plenty of customization options to fit your specific crafting needs. Overall, the Project Center Desk is a top pick for any crafter who values style, versatility, and comfort in their craft table.
Pros:
- Adjustable shelves for customizable storage options
- Large working surface area of 15 sq ft
- Ability to work comfortably while standing or sitting
- Available in oak, black, or white to match your craft room decor
Cons:
- More expensive than the Sauder Craft Pro table
- No drawer space for easy access to essential tools and supplies
Check the latest price and color options for the Project Center Desk on Amazon.
Budget Option

Ameriwood Home London Hobby Desk
A contemporary and space-saving craft table that includes wall shelf storage.
This one maximizes the working surface area by extending up to the wall, making it perfect for moving heavier crafting equipment, such as a sewing machine, out of the way without having to remove it from the table.
In addition to its stylish design, it is also a budget-friendly option and comes in two finishes: espresso and white. It features a countertop workspace of 47″ wide by 26″ deep and 12 storage cubbies, each measuring 9″ deep, 11.5″ wide, and 15.25″ tall. There is ample space for books, binders, and crafting accessories, although it should be noted that there is no storage space for larger crafting equipment like a sewing machine. The desk is made of laminated hollow core, particleboard, and MDF and is compact but sturdy. Some pros of this desk include its contemporary design, wide countertop space with integral wall shelving, choice of finishes, and good storage. However, it should be noted that it is not waterproof or water-resistant, so it may be a good idea to protect the table surface if your craft involves liquids.
Pros:
- Contemporary design
- Wide countertop space with integral wall shelving
- Choice of two finishes
- Good storage with 12 cubbies
Cons:
- Not waterproof or water-resistant
- No storage for larger crafting equipment such as sewing machines
Another Worthy Mention
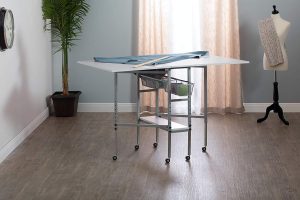
Sew Ready Studio Designs Folding Multipurpose Hobby and Craft Cutting Table
Nifty Foldable Table ideal for Dress Making:
This is a great fold-away option. It’s an ideal table for dressmaking and quilting, but it’s also great for general crafts too – for those, for example, who need a more practical fold-away solution to working on the dining room table.
For general crafts, there is a plain tabletop version, and for dressmakers and quilters, there is a version with a grid marked out in inches and centimeters with additional radial and angled lines.
You can choose between a fixed or adjustable height, ranging from 30.25″ to 39.25″. This is ideal if you prefer to work standing up. The adjustability in 1.5″ increments means you won’t be hunched over, which is much better for your back.
There are two slide-out wire mesh storage draws in the central area and a bottom shelf that’s the perfect size for a die-cutting machine. Additionally, the table has lockable castors for either portability or stability.
Pros:
- Fold-away option for easy storage
- Versions available for general crafts or dressmaking/quilting
- Adjustable height for standing work
- Two slide-out storage draws and bottom shelf for storage
- Lockable castors for portability or stability
Cons:
- There are no cons with this table – if you specifically want one that is lightweight, portable, and foldable. It may not be as strong as a regular table, but it may just be ideal for your needs.
Check the latest price and options for Sew Ready Studio Designs Table on Amazon.
Also Concider
Arrow 901 Auntie Em
Last, but by no means least, this is a great option for quilters.
The Auntie Em cabinet is an innovative and neatly designed sewing and quilting table from the well-respected company, Arrow.
They offer a fantastic range of sewing and quilting cabinets, although they may not be the cheapest options. This particular cabinet is more affordable than most in their range and comes with a feature that more than compensates for the price.
The table has an automatic lift that raises your sewing machine into place for you. Sewing machines, especially quilting ones, can be heavy and this feature prevents you from straining your back every time you want to set it up. The elevating mechanism also places your machine completely flush with the tabletop, which is ideal for larger projects, such as quilting.
The cabinet comes with a universal insert that can accommodate most sewing machines. However, you can also order a custom insert from Arrow for a specific size of machine. The only downside is that you’ll need a screwdriver and plenty of time to assemble the cabinet. There is a video on Amazon that shows the assembly process, which, while not rocket science, only needs to be done once.
Pros:
- Automatic lift raises sewing machine into place, reducing strain on back
- Flush tabletop design is helpful for larger projects
- Comes with universal insert that can accommodate most sewing machines, or custom insert can be ordered from Arrow
- Plenty of drawer space for fabrics and tools
Cons:
- May require some assembly with a screwdriver and time
- More expensive than some other options on the market
Check the latest price for the Arrow 901 Auntie Em on Amazon.
Frequently Asked Questions
Are crafting tables easy to assemble?
Crafting tables aren’t difficult to assemble but they tend to have more built-in storage areas than an office desk, for example, so their design tends to be more complex.
This means they do generally take longer to put together. For that reason, it’s a good idea to get a friend to help you put it together.
Are crafting tables better than a desk?
Craft tables are much better than regular desks for crafters. They are specifically designed for crafts so tend to have more storage areas for tools and materials, as well as space to add storage bins for scraps.
They often include cupboard space for a sewing machine, die cutting machine or other essential equipment and some have tall storage areas for rolls of paper or fabric, slanted shelving for paper stock or spindles for spools of ribbons, etc.
Can you fit a sewing machine in a crafting table with storage?
Many crafting tables do have cupboard space for a sewing machine. Crafting tables are a great way to keep all your craft supplies and equipment together in one place. They are specifically designed for the purpose. They tend have a large countertop so there’s generally enough room to easily accommodate a sewing machine on top and still work on something by hand, even if the machine can’t be stored away.
Do crafting tables take up much space?
Crafting tables are generally quite spacious but that’s because crafts tend to require equipment such as a sewing, cabbing, die-cutting machine or serger. They also require tools, materials, and other supplies and you need lots of space to work.
Though many are larger than a regular desk they are much better at organizing your equipment so your craft space will look much less messy.
Alternatively, if you are short on space you should choose a foldable craft table.
Other Crafting Tables We’ve Reviewed:
These are the products that didn’t quite make our top picks, but they’re still pretty good so you might like to take a look:
Shabby Chic
Signature Design by Ashley Mirimyn Home Office
This is one is great for simple crafts and for small spaces. It’s also available in several bright colors.
Key Features:
- Shabby chic distressed wood veneer finish.
- Includes a water hyacinth basket for storage.
- Great budget option.
Foldable Space Saver
Southern Enterprises Fold Out Organizer & Craft Desk
This is a great option for small spaces or the occasional crafter or hobbyist.
Key Features:
- Collapsible / fold-out side panels.
- Converts into a filing cabinet.
- Folds out to a surface area of 48 inches wide.
Fold-Away Craft Desk.
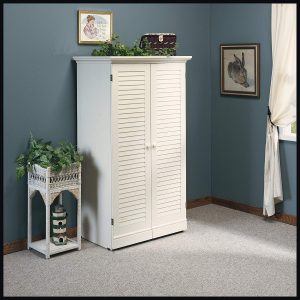
Sauder Harbor View Craft Armoire
This one folds out and converts to a desk with built-in shelving.
Key Features:
- Made in the USA for stain-resistant, laminated wood.
- At 55″ wide by 40 ¾” deep and 38½” high, it’s perfect for standing while you craft.
- Great for storing and tidying away sewing, crafting, scrapbooking or paper and art projects.


![[alt]](/wp-content/uploads/2016/11/Blue-Hearts-1.jpg)


